


Prefect is a workflow orchestration tool empowering developers to build, observe, and react to data pipelines. It’s the easiest way to transform any Python function into a unit of work that can be observed and orchestrated.
Prefect offers several key components to help users build and run their data pipelines, including Tasks and Flows. With Prefect you gain scheduling, retries, logging, convenient async functionality, caching, notifications, observability and event-based orchestration.
Prefect is built on top of the open-source Prefect workflow engine. Prefect Cloud is a fully hosted and ready-to-deploy backend for the Prefect open-source library. Prefect OSS server is a lightweight, open-source alternative to Prefect Cloud.
This article shows how to use lakeFS with Prefect orchestrated pipelines, to quickly analyze and troubleshoot failed/erroneous pipelines, improving data reliability and reducing time to resolution. lakeFS will provide the ability to define CI/CD for the data that is managed and produced by the data pipelines. This concept guarantees the robustness and quality of the data.
The sample in this article uses a community developed prefect-lakefs Python package (thank you for contributing this Manoj & Brad). prefect-lakefs is a collection of Prefect tasks which are used to interact with lakeFS. It also stores lakeFS credentials as a Block in Prefect.
How is Prefect used with lakeFS?
The goal of using Prefect with lakeFS is to create an isolated environment of the data to run production pipelines, in a way that ensures only quality data is exposed to production. Instead of running your data pipelines directly on production data, lakeFS creates an isolated zero clone copy of the data, that will allow you to safely run production pipelines, and in case of failure or quality issues, troubleshoot them directly.
There are two options to run your Prefect pipelines in isolation by using lakeFS:
Option 1: Run Pipeline in Isolation
With this approach, we will create a branch out of our production environment (with lakeFS this is a zero copy operation that takes a few milliseconds) and run the Prefect pipeline on that branch. Once completed, we will merge the final output of the pipeline back into production:
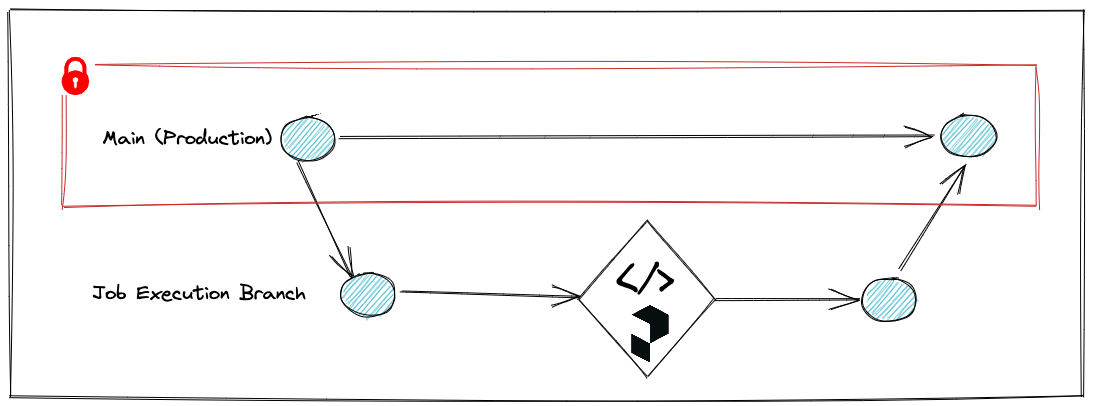
This approach might be the best approach for a quick win, as you canwrap any existing Prefect pipeline in minutes.
| Pros | Cons |
| Extremely quick setup for any existing Prefect pipeline | No Commit history within Flows & Tasks of an existing Prefect pipeline |
| Isolated “staging” environment. Data is promoted atomically only once a pipeline ends | |
| Only promote high-quality data to production; users are not aware of “in-process” data | |
| Easily rollback the data assets state in case of error to before the pipeline started |
Option 2: Execute Git actions within Flows
With this approach, we will not only run the pipeline on an isolated branch (similar to the previous option). In addition, we will run Git actions INSIDE the Flows. This means we will have a commit history of changes across all steps executed within the pipeline
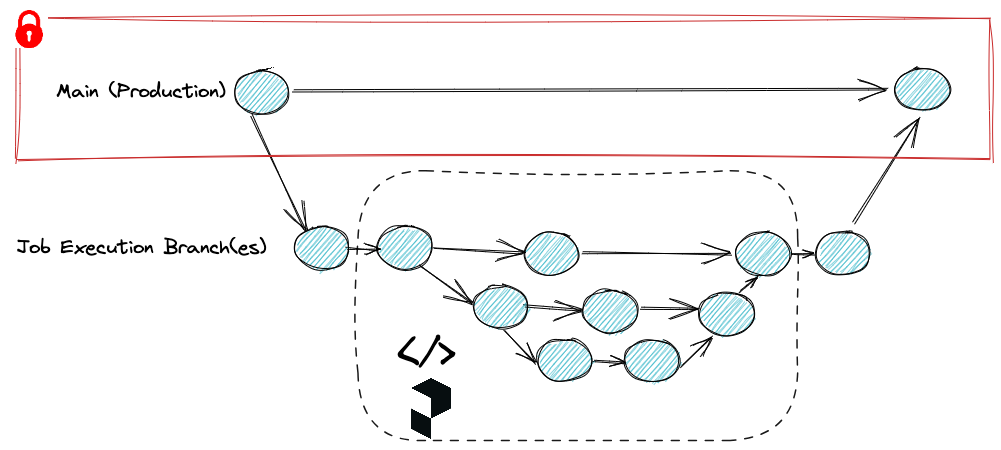
This approach requires more code; However, it provides more value on top of the previous one:
| Pros | Cons |
| Complete in-context version of the data for every step executed within a flow | Requires integrating the git actions within the Flows. |
| Isolated “staging” environment. Data is promoted automatically only once a pipeline ends | |
| Only promote high quality data to production; users are not aware of “in-process” data | |
| Easily rollback the data assets state in case of error to before the pipeline started |
Setup: How to get started
- Run a lakeFS Server
To demonstrate this, you will need a lakeFS server running.
You can either use a lakeFS Cloud, which is an isolated lakeFS environment (using our storage but you can also use your own storage). Or, use a lakeFS server running in a Docker container bundled with a sample notebook (see setup instructions below).
- Reference notebook example
We provide this sample, which can be used to run the Perfect pipeline with lakeFS.
First, clone lakeFS-samples repository:
git clone https://github.com/treeverse/lakeFS-samples && cd lakeFS-samples/01_standalone_examples/prefect-integrationYou now have two options:
Run a Jupyter Notebook server with your existing lakeFS Server
If you have already installed lakeFS or are utilizing lakeFS cloud, all you need to run is the Jupyter notebook and Prefect server:
docker compose upDon’t have a lakeFS Server or Object Store?
If you want to provision a lakeFS server as well as MinIO for your object store, plus Jupyter and Prefect, then bring up the full stack:
docker compose --profile local-lakefs upOnce you run the container, access your Jupyter notebook UI by going to the address http://127.0.0.1:58888/ in your browser:
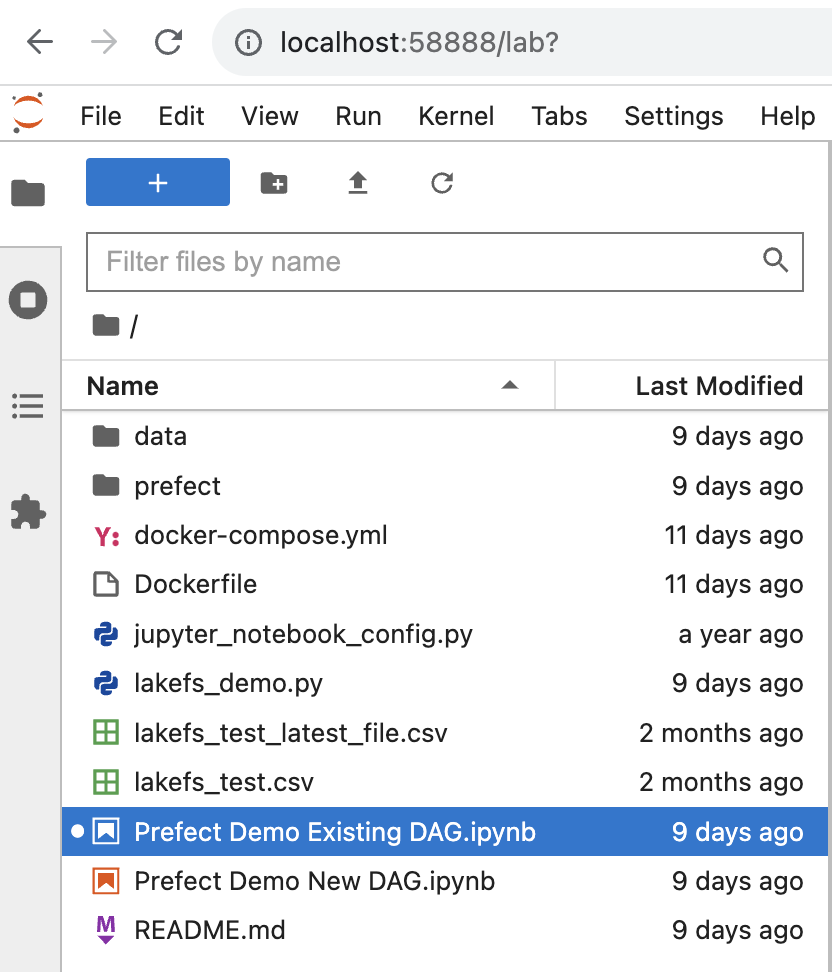
- Modify the notebooks
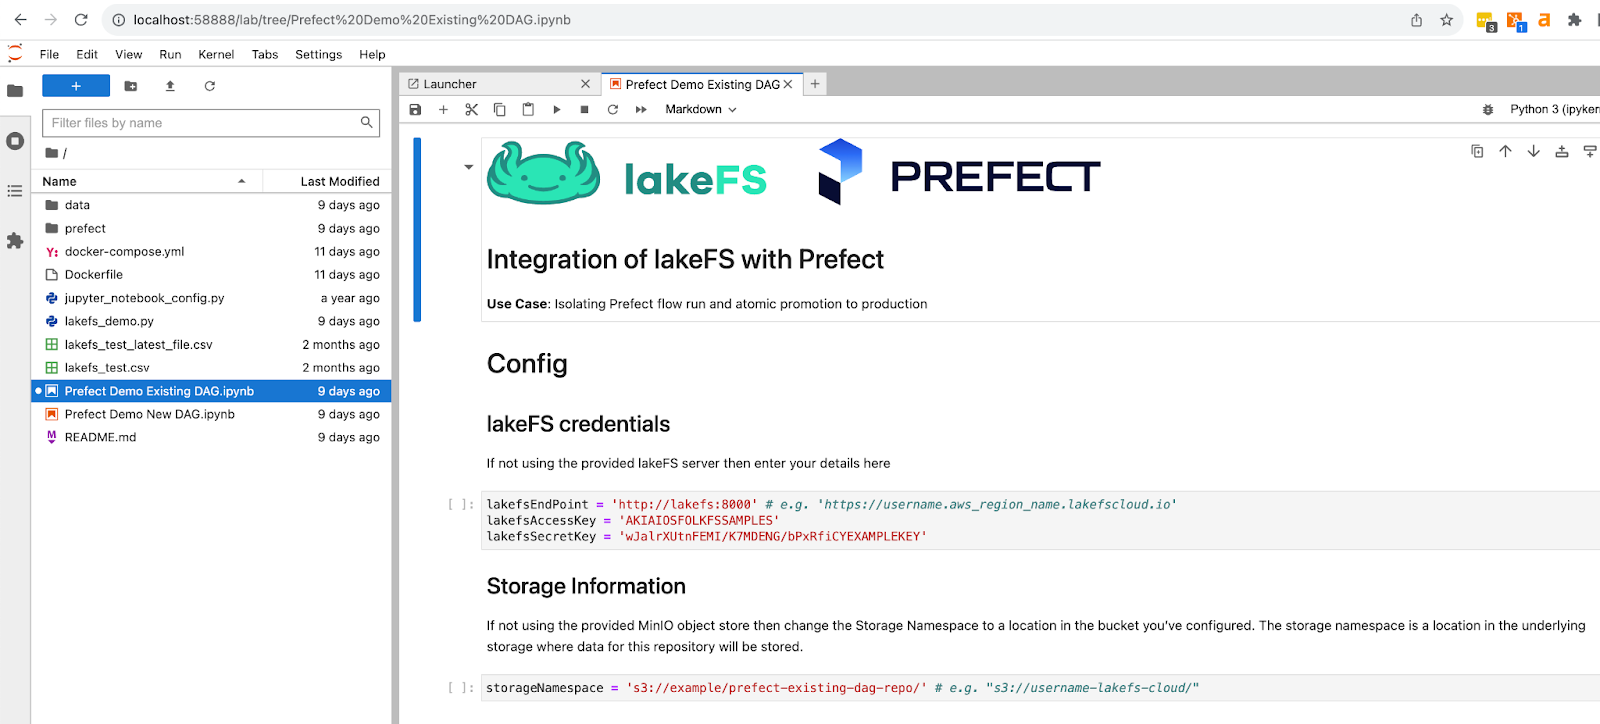
The two examples we will use are “Prefect Demo Existing DAG” (Option 1 mentioned above) and “Prefect Demo New DAG” (Option 2).
Click on the file to review and edit it:
if you are using lakeFS Server bundled with this sample, then skip the following instructions and go to the next step (4. Run notebooks)
To run this sample with your existing lakeFS Server or lakeFS Cloud, you will need to input your lakeFS server details.
Specifically,
- Change lakeFS endpoint and credentials (don’t use a backslash at the end of the lakefsEndPoint):
lakefsEndPoint = 'http://lakefs:8000' # e.g. 'https://username.aws_region_name.lakefscloud.io' lakefsAccessKey = 'AKIAIOSFOLKFSSAMPLES'lakefsSecretKey = 'wJalrXUtnFEMI/K7MDENG/bPxRfiCYEXAMPLEKEY'
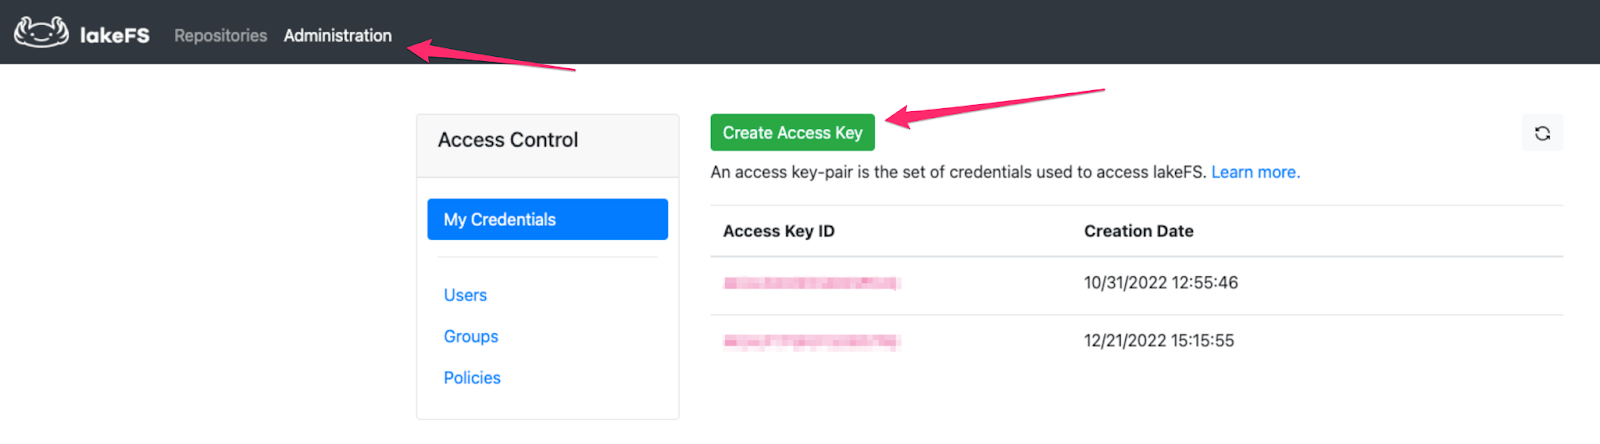
If you don’t have lakeFS access and secret keys, login to lakeFS and click on Administration -> Create Access Key
A new key will be generated:
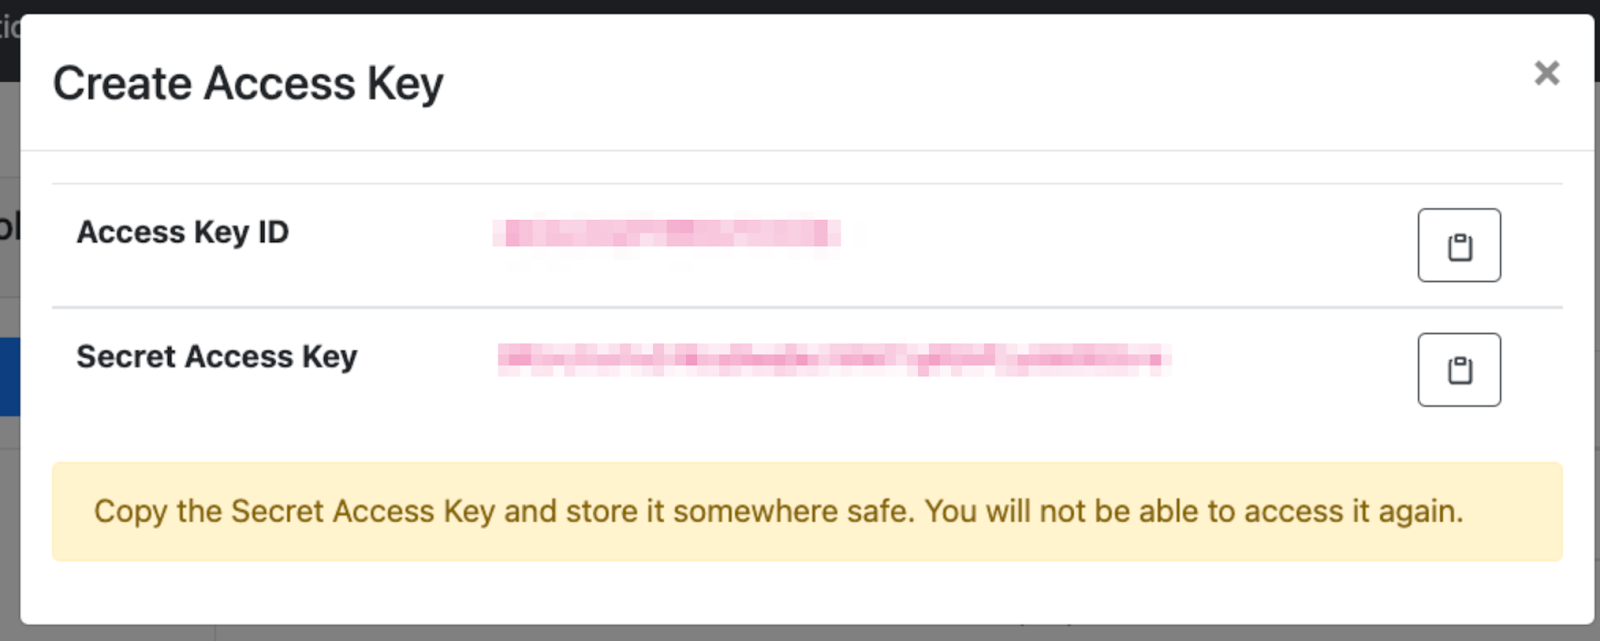
As instructed, copy the Secret Access Key and store it somewhere safe. You will not be able to access it again (but you will be able to create new ones).
- Since we are creating a repository in the demo, we will need to change the storage namespace to point to a unique path. If you are using your own bucket, insert the path to your bucket. If you are using our bucket in lakeFS Cloud, you will want to create a repository in a subdirectory of the sample repository that was automatically created for you.
For example, if you login to your lakeFS Cloud and see:

Add a subdirectory to the existing path (in this case, s3://lakefs-sample-us-east-1-production/AROA5OU4KHZHHFCX4PTOM:028298a734a7a198ccd5126ebb31d7f1240faa6b64c8fcd6c4c3502fd64b6645/). i.e. insert:
storageNamespace = 's3://lakefs-sample-us-east-1-production/AROA5OU4KHZHHFCX4PTOM:028298a734a7a198ccd5126ebb31d7f1240faa6b64c8fcd6c4c3502fd64b6645/prefect-existing-dag-repo/' # e.g. "s3://username-lakefs-cloud/"- Run notebooks
You can now run the notebooks step by step and view the changes in your lakeFS Server.
Note:
- The Setup tasks within the notebook will configure the pipeline as well as install a lakeFS Python Client.
- You can copy any lakeFS related links in the output log, open that link in a separate browser tab and it will take you to the applicable branch/commit file in lakeFS:

e.g. if you open any link for a commit in lakeFS, you will see lakeFS UI like this:
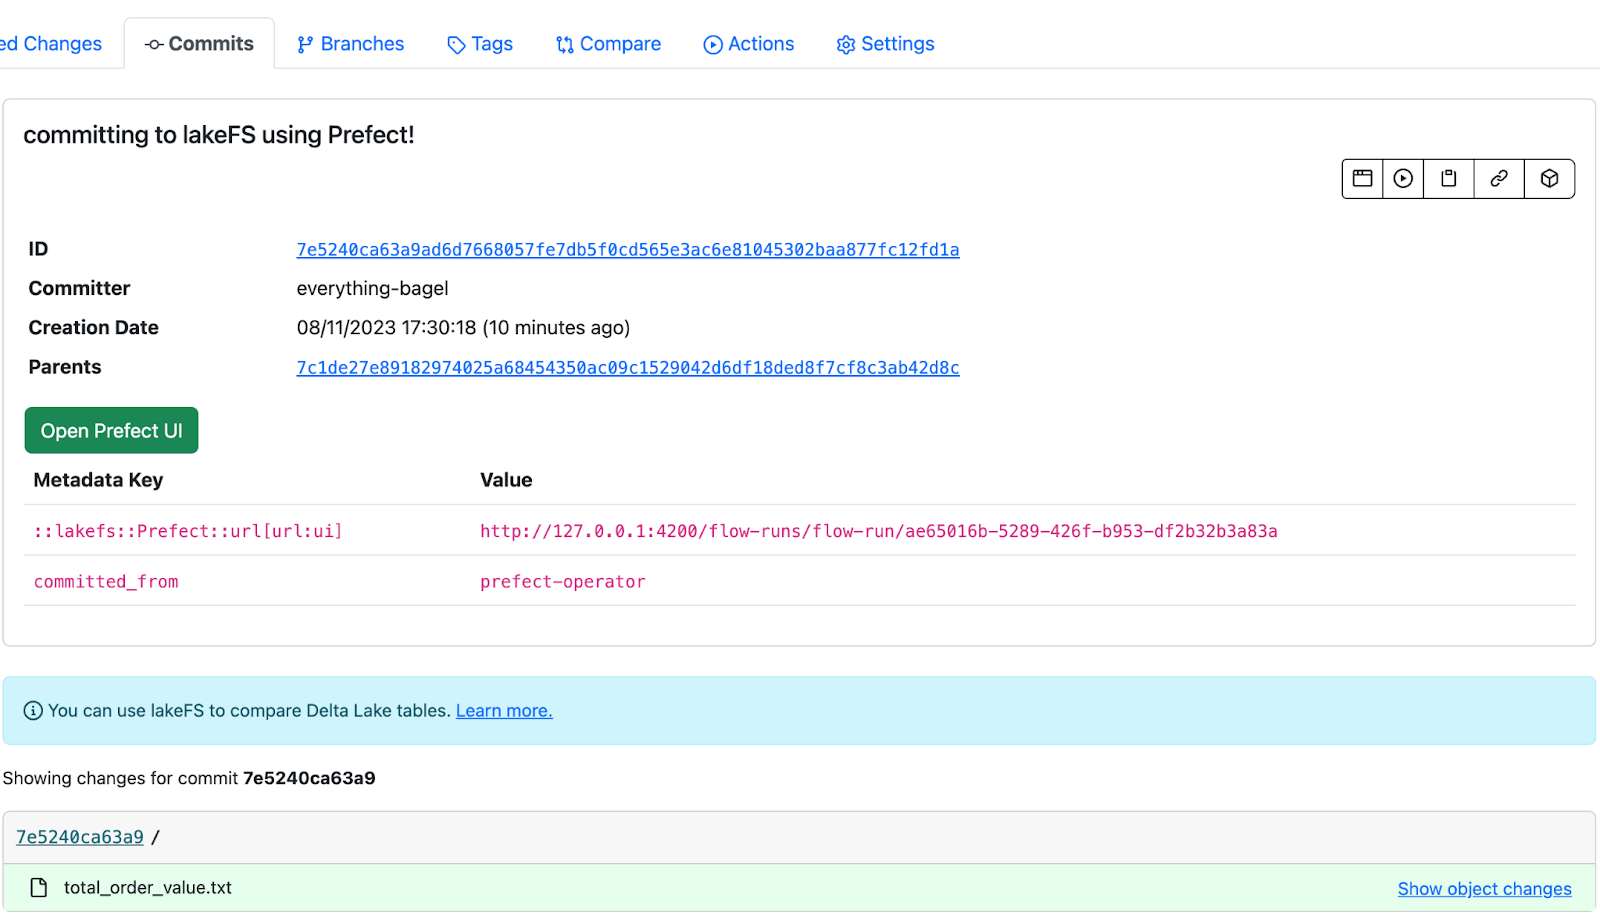
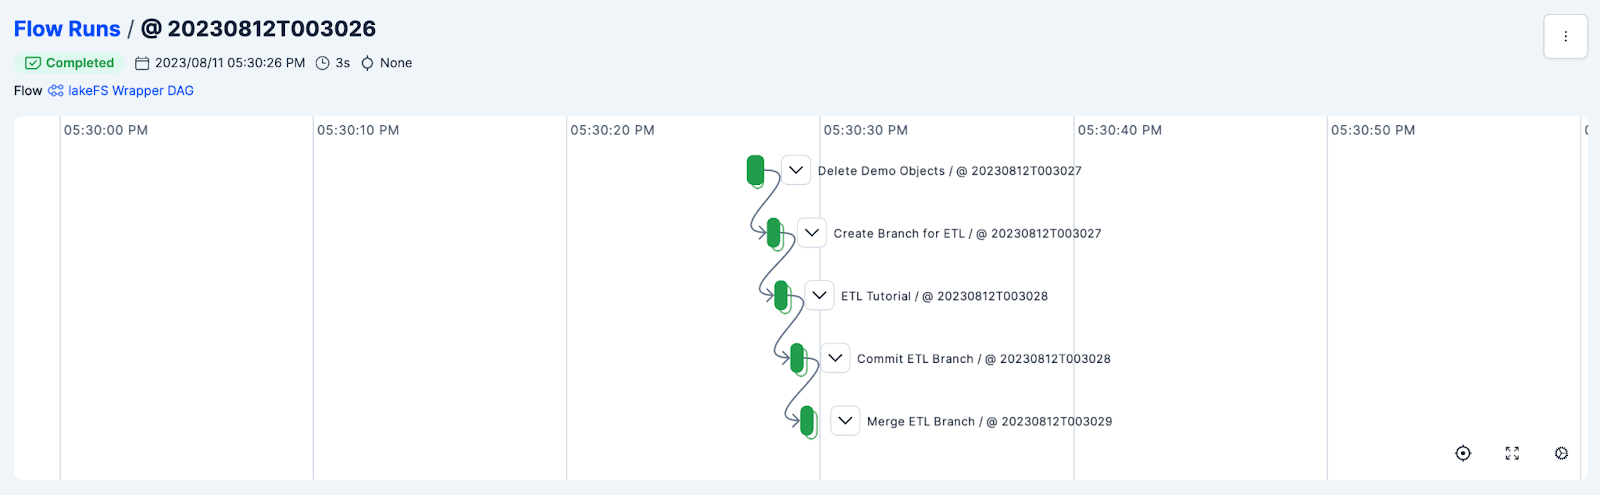
You can click on the “Open Prefect UI” button in lakeFS UI and it will take you to the applicable Flow run in Prefect which created this particular commit:

- If you go back to your notebook and run the next cell, then you can click on the link to go to Prefect UI when prompted. For example, click here:
To get access to the graphical representation of the Prefect flow:

- As the pipeline runs, don’t forget to switch over to lakeFS and observe the branches, merges and commits taking place.
- Troubleshooting pipelines
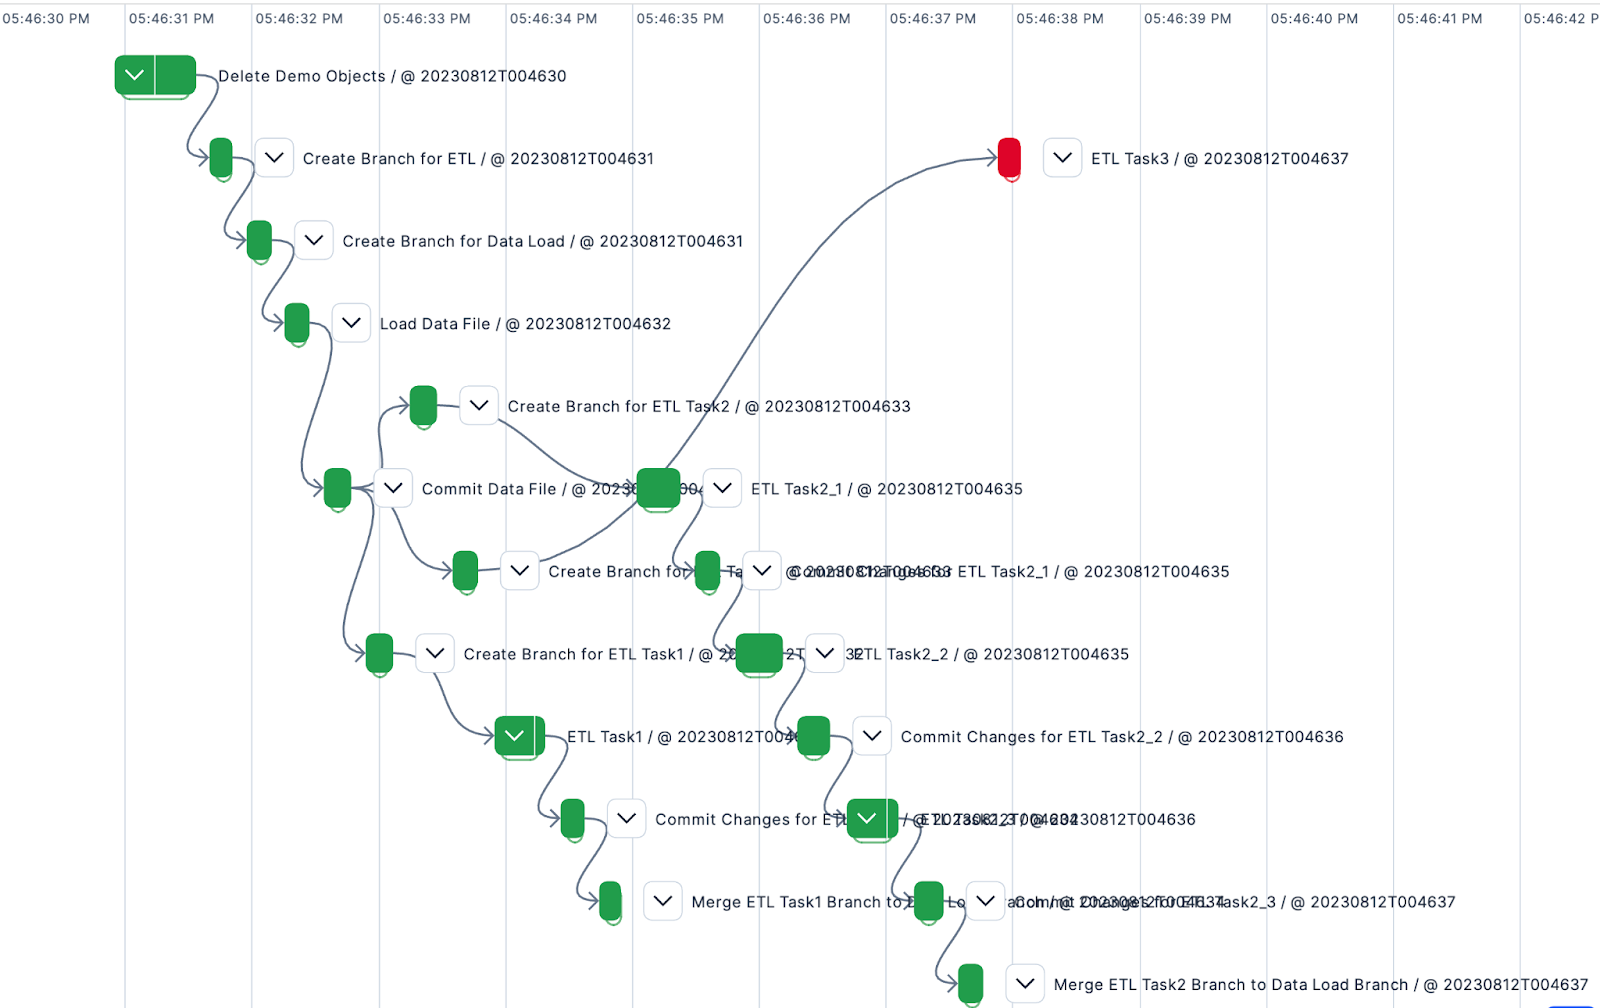
The second notebook (“Prefect Demo New DAG”) runs the same pipeline twice. Once with valid input, and the second with invalid input.
When you run the pipeline a second time against the bad input data file (“lakefs_test_latest_file.csv”), the task will fail and you will get the following “Exception”:

This exception happens because column “_c4” (or 5th column) is missing in the latest file.
You will also see in Prefect UI that “ETL Task3” operation failed:
Now, with lakeFS, we can see the exact data at the point of the failure in that specific task.
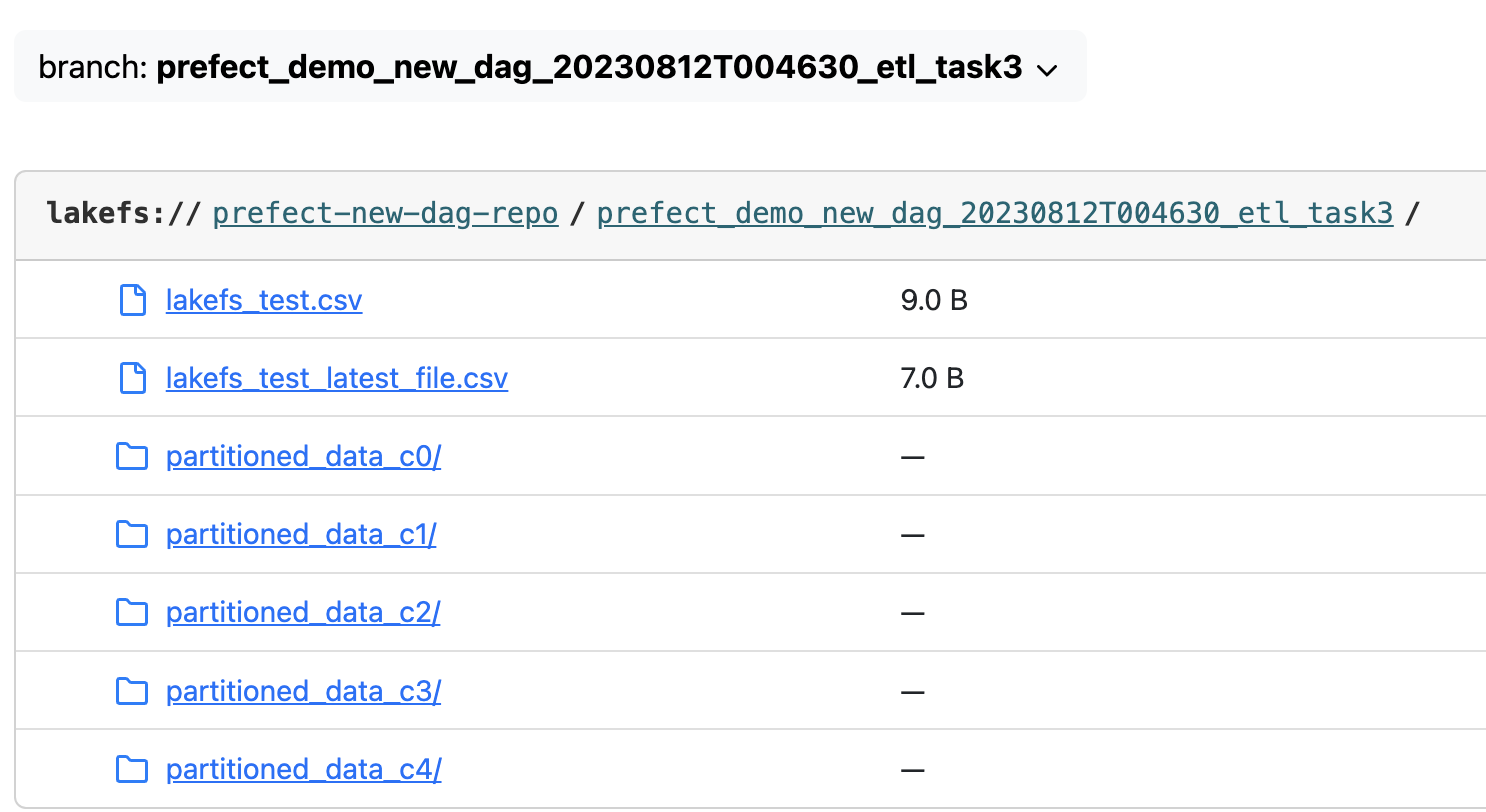
- Get the snapshot of the data at the time of the failure
In the output log, you will see the logged message for “Create Branch for ETL Task3” subflow (which is the flow before the failed “ETL Task3” task) with a link to the branch at the time of the failure:

Open that link to open lakeFS server on that branch:
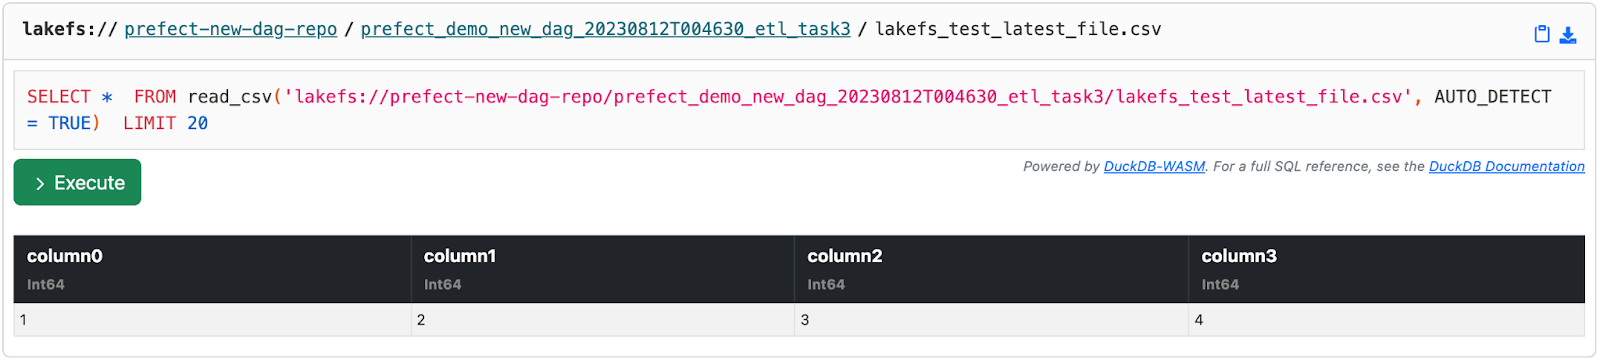
You can click on the file (lakefs_test_latest_file.csv) and indeed, you can see the file is missing the 5th column:
Summary
We went over two scenarios: running an existing pipeline in isolation and creating a new pipeline with Git-like actions. In both cases, you achieve:
- Isolated staging environments with no copy.
- Promote only quality data to production: Atomically promote the data only once the pipeline finishes execution successfully.
- In case bad data was introduced to production, rollback to a good state in milliseconds.
lakeFS not only saves on storage (up to 80%) but also dramatically increases productivity, as these tasks are otherwise manual and time-consuming. Cherry on top: If a production outage ever happens, you can always rollback to where you were before.
lakeFS is an open-source solution, and everybody is welcome to use it for free. We have a remarkable community surrounding lakeFS already, so join our Slack channel and check out lakeFS on GitHub.
We also provide enterprise support as well as lakeFS Cloud – a hosted solution with additional features.


